In this post we will discuss about how to integrate UFT with a GIT Repository. We will use UFT 14 with GIT hub repository for this post.
To use GitHub, you can create a new account at github.com.
Assumptions: GIT is already installed on your system. You can grab the installable files below
Creating a GitHub Project
Login to your GitHub account and create new repository
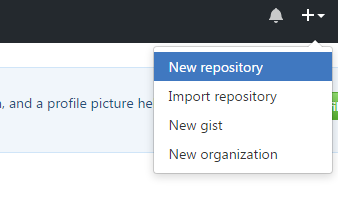
Enter a Repository name and provide description.

If you want a private repository, then you will have to pay for it, for this demo I will use public repository with No License

Click on create Repository.
Once the repository is created then you will have to initialize this repository in one of the folders on your computer.
This folder will serve two purposes
- This will be the connection point between your Git repository on GitHub.Com and your UFT Test.
- You will open your UFT test from this folder and make changes here.
Initialize Git Repository on your System
- Create a folder on your computer.
- Copy the Clone path from your Git Hub repository

https://github.com/XXXXXXXXX/Repository_Name.git
-
Open GIT GUI

-
Click on Clone Existing Repository

- Source Location is the GitHub Repository location you copied before and target is the folder you created on the local computer.
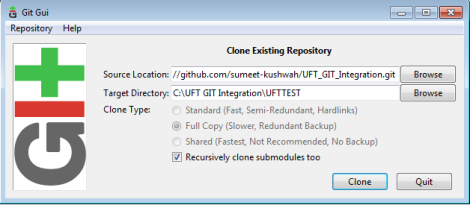
- Click Clone. Git GUI will clone the repository. Close the GIT GUI Tool.

Note: You can also clone the git repository using the following two commands inside git bash or inside command prompt (If Environment variables are set).
You must navigate to the directory where you want to clone the project
git init
git clone https://github.com/<Git Clone path>.git
Creating UFT Test
Once your Git repository is created and Remote is added, you are now ready to create your UFT test.
Open UFT and Click on New->Test
In the new test window, Provide the name of the test and select the folder, where you have initialized the GIT repository.

Click on create button.
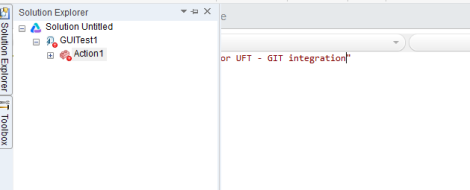
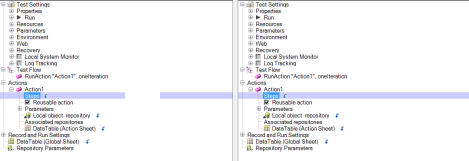
Open Solution explorer and you should see small red circular icon below Test and Action names. This indicates that the files are not pushed to the GitHub project yet and they are only available in your local folder.

Pushing Changes to the GitHub.com Repository
To push the changes to the online repository
-
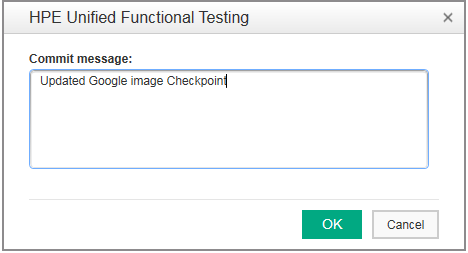
Right Click on the Test case name and Select ‘Git Commit’.

-
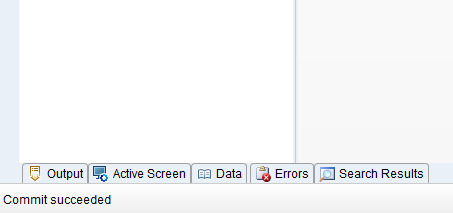
Enter the Commit message, and click on OK button.

-
You should see ‘Commit Succeeded’ on the bottom left corner of UFT
-
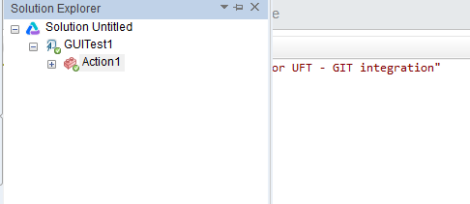
Open the solution explorer again and you should see green check marks on test and action.

-
Right click on the test again and select ‘GIT Push’.

-
Click OK. This will push the changes to GitHub.Com repository.

-
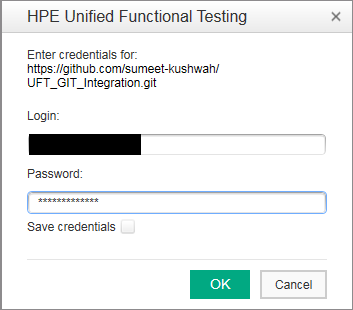
Enter User name and password for GitHub.com, and Click on OK button.
-
UFT will push the changes to GITHub repository.

- You will see the message ‘Push succeeded’ on the bottom left corner of UFT

Now you have successfully uploaded the changes from UFT to GitHub Repository. Open the Repository and you should see the UFT test files there


This completes the basic tutorial. Now let’s get into some of the advanced stuff.
Creating and Merging Branches
By Default, Git creates a Master Branch and this branch must always have your latest copy of the runnable code (Generally).
If you have to change the test you have previously created, you should always create a separate branch for the changes and once the changes are done then you should merge those changes back to the Master branch.
Consider the below scenario,
If you have created a test for login to Gmail. Now if google changes the image on the login page and you want to update the image checkpoint there, then
- You should create a separate branch (e.g. Google_Login_Image_Chkpnt_Update) in your Git repository and check it out. This will create a copy of your existing code.
- Update the code changes and test them in a local computer.
- Once you are satisfied with the code changes then, Merge this Branch(Google_Login_Image_Chkpnt_Update) from local computer with the Master Branch on GitHub repository. This will update the Master Branch with the latest code.
How to create a branch?
UFT does not provide us the tools to create the branch.
To create a new branch
-
Right click and open the Git bash.

- On Git bash execute the following command
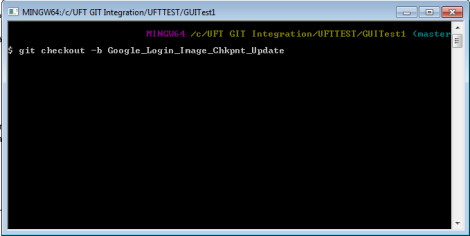
Git checkout –b <New_Branch_Name>
This command will create a new local branch and check it out in your local repository.

- Now close UFT test and open it again (Just to make sure that changes are in effect).
-
Update your test and save it.

-
Now go to your solution explorer and you will see small red circles on the test and action name. This means that the changes are only available in your local repository.
-
Commit and push the changes (As discussed before).


-
Your will see that there are two branches in your GitHub.com Repository.


-
Click and open the Branch “Google_Login_Image_Chkpnt_Update”. You will see the commit message we have provided.

Reverting Back the changes you made
Now your changes for the Google Image checkpoint is inside the “Google_Login_Image_Chkpnt_Update”. After your first commit, you can revert the changes back to this commit using Git Revert command in UFT.
So to demonstrate this I will add another message box in Action 1 and save the test.

Now open the solution explorer and Right click on the test name and Select “Git Revert”.
UFT will close the test and reopen it. All of your changes since the last commit and push will be deleted.
Code in Action 1 is reverted back to

Comparing UFT Test with Previous versions
if you have made changes in the local repository, then you can compare the local repository test to the last commit using Compare with previous revision option.
Now I am adding the same message box again and then I will compare this to the code available on github.com

To Compare the code with previous version
-
Right Click and Select -> Compare with previous version.

-
Asset comparison tool will open.

- A blue down Arrow in front of the assets represents that we can drill down and see the actual differences. So in this case I am clicking on the blue down arrow in front of Steps
-
Comparison window for steps will open

-
You can also see the changes in the test settings for the two versions Under Test Settings.
Commit and push the changes. We will merge this change to master repository
Merging Changes to the Master Repository on Git server
UFT does not provide any tool for Merging the changes back to Master Repository, so we will do it with bash commands.
We will merge the changes from “Google_Login_Image_Chkpnt_Update” local repository to master repository on the git server.
Open the bash and type the following commands
git checkout master
This will checkout the master branch. After this execute
git merge Google_Login_Image_Chkpnt_Update
This will take the changes from Google_Login_Image_Chkpnt_Update repository and update it in master repository.

Close and open UFT test, your Master branch will now have the changes from the Google_Login_Image_Chkpoint_Update branch.
The main learning point is that UFT Git integration is still not as good as eclipse – Git integration, and UFT still can’t deal with Git branches very well. Hopefully in future release we will have a lot of other functionalities included.
For your reference, you can get more details about Git commands below
https://git-scm.com/book/en/v2/
Or you can download the Git book below
https://progit2.s3.amazonaws.com/en/2016-03-22-f3531/progit-en.1084.pdf
Let me know, if you have any questions in comments.


Pingback: UFT GIT Integration | Automation Insights·
Pingback: UFT GIT Jenkins Integration | Automation Insights·
This is an amazing post Sumeet
LikeLike
Thanks Toyer!!
LikeLike
Is there any on executing UFT tests from Gitlab using Gitlab-ci.yml
LikeLike
Hi Lisa,
You can do UFT executions from any where, you only need two things
1) Download UFT scripts to a folder
2) Run the script using UFT’s AOM.
I have no experience with Gitlab-ci.yml, but I am sure you can do it, if it allows you to run custom scripts.
Let me know if you need any other help.
LikeLike
Interesting, I was thinking the same. Let me know if you find a solution for this–If i find something I will update here
LikeLike
Hi Sumit,
So for UFT , GIT to be integrated , we need to have both on same machine ?
I have UFT on remote desktops and GIT on local network.
LikeLike
You will need to install UFT and git client on the same machine.
LikeLike
I am basically trying to enable automation test cases execution from Octane.
LikeLike
Hi Sumeet, is there a proxy setting in .gitconfig needed, as my initial clone failes with a timeout?
LikeLike
Hi,
If you are using the Git server hosted on Intranet then you should not have the issue with the proxy server. But if your git server is hosted outside your network and you are using proxy server then you will have to follow the below steps
1) Open Git bash and navigate to the folder with .git file
2) execute the following command
git config –global http.proxy http://proxyuser:proxypwd@proxy.server.com:8080
change proxyuser to your proxy user
change proxypwd to your proxy password
change proxy.server.com to the URL of your proxy server
change 8080 to the proxy port configured on your proxy server
Once proxy setting are done then you should be able to access git server without any issues.
LikeLike
I have GIT and UFT on the same machine and I cloned the repository to my local folder and I created a new test in the same folder.Still, I don’t see the small circular icons on the test and Action in my UFT.That is I am unable to see Any Git commands enabled in UFT. Can you please help me where I must be missing on
LikeLike
As long as you have the .git folder in the parent directory UFT should show the icons. Also which version of UFT are u using ?
LikeLike
I have the .git folder in the path where I cloned my repository on local. UFT version is 14.00
LikeLike
Hello Sumeet. Currently only tests can be saved in git along with all their local resources. But am I able to put “external object repository” onto GIT?
LikeLike
Yes you can.
LikeLike
Thank you for the article. It works. The only issue I would like you to know is, opening a test in UFT takes very long time. Not sure how to overcome this issue
LikeLike
Have you tried sparse checkout or —depth option, this should just copy the latest version. Also you can use a batch file to download the copy of your code from git, these options will help in speeding up the downloading of test from git.
There are few things which you can do to seed up UFT part, you can check to make sure that UFT is loading the correct addins and make sure that you are downloading the test on a local drive.
Let me know if you have any other questions.
LikeLike
Is there any way to stop UFT Auto commits for .gitignore file?
LikeLike
Here is what’s available online
The .gitignore file should be in your repository, so it should indeed be added and committed in, as git status suggests. It has to be a part of the repository tree, so that changes to it can be merged and so on.
So, add it to your repository, it should not be gitignored.
If you really want you can add .gitignore to the .gitignore file if you don’t want it to be committed. However, in that case it’s probably better to add the ignores to .git/info/exclude, a special checkout-local file that works just like .gitignore but does not show up in “git status” since it’s in the .git folder.
Bottom line is that it should not be ignored.
Let me know if you have any questions.
LikeLike
Hello Sumeet,
This whole process is to replace ALM ( QC)?
Thanks in advance for your help
LikeLike
Yes this will replace ALM for version control with Git which is industry standard.
LikeLike
Hi,
sometimes i am getting an error push failed in UFT, is there any way i can check what has failed?
and sometimes eventhough push failed error occurs in UFT, i notice that changes have been pushed to remote repository. it is bit confusing.
is there any way we can analyse these issues?
LikeLike
I have integrated gut with uft for the first time…along with the test I have a function library folder just inside the test like we have actions. When committing the test to git it says that extra files will not be committed
How to commit the function library also?
LikeLike
Validate the details within “.gitignore” file and ensure that it is not resulting in your Function library getting excluded due to the default regex names setup in the “.gitignore” file.
LikeLike
I have the similar question as one of the above “I have integrated gut with uft for the first time…along with the test I have a function library folder just inside the test like we have actions. When committing the test to git it says that extra files will not be committed
How to commit the function library also?”
LikeLike
Git init should be part of outer most folder, then it should work..
LikeLike