Please read this article carefully before implementing and make sure that you understand the whole process. I will not be responsible for any issues. If possible, first implement it in a dummy/test ALM project.
In this post we will discuss about how to create a workflow for moving test from Test Plan Module to Test Lab module in ALM.
How this workflow will work?
We will add a custom button in ALM and when you will select a folder in test plan and click on this custom button then all of your folder structure and tests will move from test plan to test lab.
Adding the custom button in ALM
Follow the below steps for adding the custom button in ALM.
-
Login to ALM and click on Tools -> Customize

-
Click on workflows and then click on script editor.

-
In Script editor, click on Toolbar button editor and from the command bar select Test Plan

-
Click on Add button at the bottom of the screen.
-
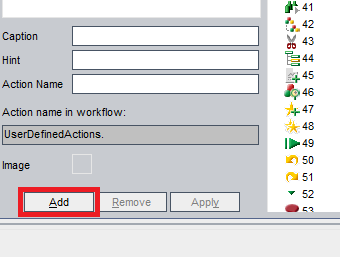
Change the Caption to Move_Tests_To_Lab and add the Hint as “Move test plan folder to test lab”.

- Select an Icon from the right pane and click on apply.

7. Now copy the contents of the “Action Name is Workflow” textbox

we have just created a custom button in the test plan. To Save this change, Click on File -> Save.
Adding the Code to move the test from test plan to test lab
To add the code follow the below steps
-
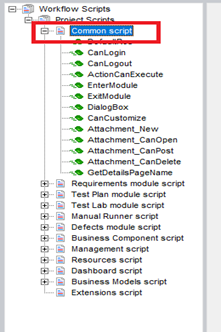
Click on the Script Editor and open Common scripts under the Project Scripts
-
Add two Global variable here on the first line of the code. All function definitions must be below this line.
Dim TestPlanFolderID
Dim TestPlanFolderPath

-
Now inside “ActionCanExecute” function create a ‘If’ condition with the “Action Name in Workflow” Textbox value
if ActionName = "UserDefinedActions.TestPlan_Action1" then
    copyToLab
End IF
We will create copyToLab function next. The whole “ActionCanExecute” function should look like this

Every time you click on the custom button, this function will be called.
-
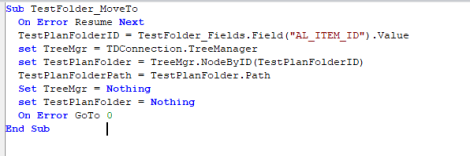
Now open the Test Plan Module Script and click on “TestFolder_MoveTo”

-
Add the following code to the TestFolder_MoveTo function
TestPlanFolderID = TestFolder_Fields.Field("AL_ITEM_ID").Value
set TreeMgr = TDConnection.TreeManager
set TestPlanFolder = TreeMgr.NodeByID(TestPlanFolderID)
TestPlanFolderPath = TestPlanFolder.Path
Set TreeMgr = Nothing
set TestPlanFolder = Nothing
The whole function should look like this
-
Now open Extensions script.

-
Paste the below code to the Extensions script (There are issues with the below code because of how wordpress is processing the VB code. Please download the code from here)
Dim OConnection
Sub copyToLab()
On Error Resume Next
Dim OTestFact
Dim OTestFilter
Dim OTestList
Dim mySNode
Dim myPath
Dim TStreemgr
Dim OTSRootFolder
Dim ParentFolderUnderRoot
Dim CurrentTest
Dim result”Get TDObject
Set OConnection = TDConnection”Get TestFactory
Set OTestFact = OConnection.TestFactory”Get Test Factory Filters
Set OTestFilter = OTestFact.Filter
”Filter Test Plan with the path of the selected folder
OTestFilter.Filter(“TS_SUBJECT”) = “^\” & TestPlanFolderPath & “^”
Set OTestList = OTestFilter.NewList
result = MsgBox(OTestList.Count & ” Tests will be copied” & vbCRLF & “Begin copy of ” & TestPlanFolderPath & ” now?”,vbYesNo,”Moving Test Plan to Lab”)‘Find if user wants to continue
If result = vbNo Then
msgbox “Test Plan to Lab Copy Cancelled”
Exit Sub
End If”’Create a folder with datetime inside the test lab
ParentFolderUnderRoot = Replace(Replace(now, “:”, “_”), “/”,”_”)Set TStreemgr = OConnection.TestSetTreeManager
Set OTSRootFolder = TStreemgr.Root
OTSRootFolder.AddNode(ParentFolderUnderRoot)
OTSRootFolder.Post()
OTSRootFolder.Refresh()‘Move Tests Below
For Each CurrentTest In OTestList
”’Call setup lab to create the folders and tests sets in lab
result = SetupLab(CurrentTest.Field(“TS_Subject”).Path, CurrentTest, ParentFolderUnderRoot)
NextMsgbox “TestSets Folders, TestSets and Test Instances Created Successfully”, vbOKOnly
On Error GoTo 0End Sub
Function SetupLab(CurrentPath, CurrentTest, ParentFolderUnderRoot)
Dim TStmgr
Dim LoopCounter
Dim Path
Dim NewNode
Dim SubjectSplit
Dim testSetFilter
Dim TSList
Dim OTestSetOn Error Resume Next
””Create Folders Below
Path = “Root\” & ParentFolderUnderRoot
OldPath = “”
SubjectSplit = Split(currentPath, “\”)
Set TStmgr = OConnection.TestSetTreeManager”””””””””” Create Folder Path ”””””””””””””””””
For each OFolder in SubjectSplit
if (Strcomp(OFolder, “Subject”, VBTextCompare) <> 0) then”’Find if the folder exist
Set NewNode = TStmgr.NodeByPath(Trim(Path) & “\” & OFolder)”If Not Found then create
if Err.Number <> 0 then
TStmgr.NodeByPath(Path).addNode(OFolder).Post
End If”’Update the Path
Path = Trim(Path) & “\” & OFolder
End If
Next”””””””””” Create a test set ”””””””””””””””
Set NewNode = TStmgr.NodeByPath(Trim(Path))””””’ Find if test set exists ””””””””””””
Set testSetFilter = NewNode.TestSetFactory.Filter
testSetFilter.Filter(“CY_FOLDER_ID”) = NewNode.Nodeid
testSetFilter.Filter(“CY_CYCLE”) = SubjectSplit(Ubound(SubjectSplit))
Set TSList = testSetFilter.newList”’Add Testset if necessary
If TSList.Count = 0 Then
Set OTestSet = NewNode.TestSetFactory.AddItem(Null)
OTestSet.Name = SubjectSplit(Ubound(SubjectSplit))
OTestSet.Status = “Open”
OTestSet.Post
Else
Set OTestSet = TSList.Item(1)
End If”””””””””” Add Test ””””””””””””””””””””””
OTestSet.TSTestFactory.AddItem(CurrentTest.ID).Post
On Error GoTo 0End Function
Everything is done now. Save it. Lets run it.
8. Close the script Editor.
9. Click on Return on the upper right corner of ALM, select Major change on the Customization changes window and Click on OK Button.

Running the workflow
-
-
Open the test plan and select the folder you want to move to test lab. Folder must be selected first before running the workflow or it will not do anything.

- Click on the Run workflow button

- Verify the folder and the count of tests in the dialog box an click on Yes.

- Once the process is complete. Click on ok button.

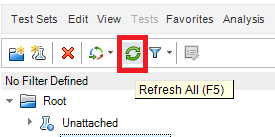
- Go to Test lab and Click on refresh button
-
-
- 6. Date time stamp folder will appear, one this folder you will have the complete hierarchy and with tests sets and tests created in Lab.

That’s it. Now you can use it whenever you want to move the tests from test plan to test lab.
Let me know if you have any questions.


Hi Sumit, thanks for the code.. but i am facing one issue..after running the code it making one folder with date time in test lab but not copying the folders from lab to plan.. please guide..
LikeLike
How are you running the code. You must select a test plan folder with tests inside it to copy the whole folder structure with tests to test lab. When you will click on run button workflow should popup a message box with the number of tests which will be copied. it should be more then 0 for this to work.
Thanks,
Sumeet
LikeLike
I am doing the same way, but it is only making date time folder and not copying the other structure which is present in test plan.. it only make date time folder and when i expand it, it shows blank.. at the time of copy it do says that there are 4 test to be copied but when the folder gets created in test lab and i expand it, nothing is therw inside it.. please suggest..
LikeLike
there is an issue with the code posted on this article. Some of the symbols used are not rendering properly. Please copy the code from below link for CopyToLab and SetupLab Functions
https://drive.google.com/file/d/146XlQSHmeK8Xef6kdfof-sMtAaA40Efv/view?usp=sharing
LikeLike
Able to view tests but not able to find the same test plan folder structure to test lab. Only data time folder is creating and nothing else.. scripte is copying as i can see the increase in count
LikeLike
Update the code from below link for CopytoLab and SetupLab, it should work after the update
https://drive.google.com/file/d/146XlQSHmeK8Xef6kdfof-sMtAaA40Efv/view?usp=sharing
LikeLike
Also, as per my requirement i don’t want date time folder i want same structure to be copied in test lab as it is present in test plan. Request you to please suggest.
LikeLike
Hi Sumeet, thanks for your replies. The code worked but there is still 1 issue. It is copying the other test plan folder which i have not even selected. There are two folders in my test plan, i selected one test plan folder with the test case but it also copied the other folder which is a separate entity.
Also, if you can please tell that how i can remove the date/time folder, i want the same structure as in test plan. I don’t want the move tests to be copied inside the data/time. I want them to be copied as it is, as it is in test plan.
Your guidance will be helpful.
Thanks.
LikeLike
It should not copy any other folders, other then the folder which you select. Can you elaborate a little bit more or send me the screenshots of what you selected in test plan and what is created in test lab.
Thanks,
Sumeet
LikeLike
please tell me some other way to provide you with screenshot, as here i am not able to paste any
LikeLike
Send them to s_kush2007@yahoo.co.in
LikeLike
Also i have selected 1 test case of 1 folder but it is copying all the folders and test cases which are present under subject
LikeLike
of test plan structure (in continuation of above comment)
LikeLike
Hi Sumeet, i have sent you mail regarding my queries. Can you please respond on that mail.
Thanks
LikeLike
Hi Sumeet,
I wanted a Macro/OTA API to extract the test results of test sent in respective folders [status of test case, pass, not completed, blocked and failed] and count in another sheet…is this possible?, kindly provide a sample
LikeLike
Hi Sumeet,
I need to extract the test status of the test sets in respective folders[Test LAB] with status count [example Passed =30, Failed =10, not completed = 5] using MACRO-OTA API.. is it possible, if Yes kindly provide a sample.
Thanks in Advance
LikeLiked by 1 person