In one of my previous post we have discussed about how to mandatory and assistive properties are used for the identification of the objects in UFT. If you want to read about how object identification actually works in background in UFT, please click here to read the article.
In this article we will discuss in detail about how to set these properties? And why it’s required?
Most of us has read about the Mandatory and assistive properties, but have never changed those in UFT, it’s because they work pretty well out of the box and HP has put up a lot of thought process in building up the list of default properties to be used.
But at some point it’s required to change it and the main reasons for that is, if developers added a different property and that’s not in the list of the identification property defaulted within UFT.
Now what happens in this scenario is that you add the object and change the properties for one object, then add another one and change the identification properties again and then you will realize that UFT is adding the properties, which are not relevant to your current application.
Now there are two options
- Continue as it is and change the properties manually, the issue with this approach is that it’s a time consuming process to add the object and then change its properties to what you want. Because in most of the scenarios UFT will also add the Index identifier and you will have to delete them manually all the time (To understand why index will be added you can read my previous article here).
The other issue with this approach is that your team might not have the same level of understanding about the application and/or object identification process in UFT, this will lead to the issue where objects added by the other team members will not have the same set of reliability and they might lead to an unstable automation testing code.
- The second option is to change the list of mandatory and assistive properties list, Which I will show you in detail shortly, but first we have to understand that, it has its own drawbacks. The issue is that UFT allows a single set of mandatory and assistive properties for a particular type of object which is not script dependent, so let say for e.g., if you have an issue identifying the Link in one application and you change the Mandatory or assistive properties in UFT, that will cause the Mandatory and assistive properties to be changed for the Link object and now if you close this test and open another UFT test which is automating other simpler apps, and try to add the new object, this new object might face the issue because of the changes you have made in the global configurations.
Now, the good news is that it won’t affect the already added objects.
The reason for the above explanation is that, now you can take a better decision about, if you really have to change the global identification properties of UFT.
Now, let’s see how to change the Mandatory and assistive properties
How to update Mandatory and assistive properties
Open UFT and go to Tools-> Object identification
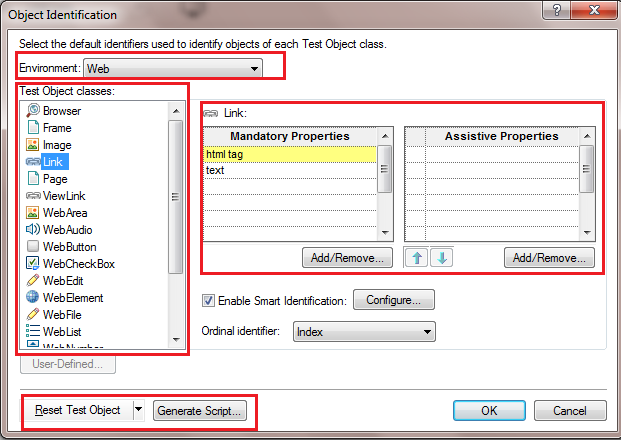
Here is the list of important options available
- Environment: It will reflect the number of object environments added in the add-in selection dialog box.
- Test Object classes: These are the object types which you can add within UFT. For e.g., Link or textbox.
- List of Mandatory and assistive properties: When you select an environment and then select a test object class like Link, you can see the list of mandatory and assistive properties on the right had side.
- Add/Remove button: Using these buttons you can update the list of properties for a particular object.
- Reset Test Object button: Using this button you can reset the object identification properties to the UFT default properties.
- Generate script button: Using this button you can generate the scripts to change the properties of the object identification(we will discussion on this later in this article).
To update the mandatory and assistive properties click on Add/Remove button and select the new set of properties from the list

Updating the mandatory and assistive properties for a specific test
Now, as discussed earlier, you cannot update the mandatory and assistive properties for one particular test and that might create issues, when you try to automate other applications. To overcome this, what you can do is to use the generate script button once all of your identification properties upgrade is done.
You can save this script in a particular location and run it when you want to change your properties to the new set of properties.
Now when you want to change the properties to default then
Click on the Reset Test Object and select Reset All (This will reset all of the properties you have ever changed) .Then click on generate scripts.
This script will just change all of the properties to default properties.
So now you have two scripts one if for changing the properties for a particular application and another one is for changing the properties to default.
You can run these two files(double click) to quickly change the properties as you work on different tests.
Important note: make sure that you have the correct add-ins selected, otherwise scripts may not work.
One last thing to be considered, when you are trying to update the list of Mandatory and assistive properties is that, UFT will have to add all of the properties listed in the Mandatory properties to the Object repository, but UFT will make an intelligent choice about, if a particular assistive property should be added to object repository or not.
So if you make a bad decision to keep something in Mandatory properties, then there is a good chance that you see a blank property added to object repository.
If you add the same property as the Assistive property, then UFT will be able to make the decision, if the property should be used for identification.
Also, if you aren’t sure about a property, then just add it to the assistive properties, this will make sure that the property is utilized, only if required.
Let me know, if you have any questions

